How We: Capture and Process Drone Imagery
Follow this step-by-step process to plan drone flights, capture imagery, and process it into an orthophoto for seamless integration into Permiehub for project referencing and design.
Estimated reading time: 11 minutes
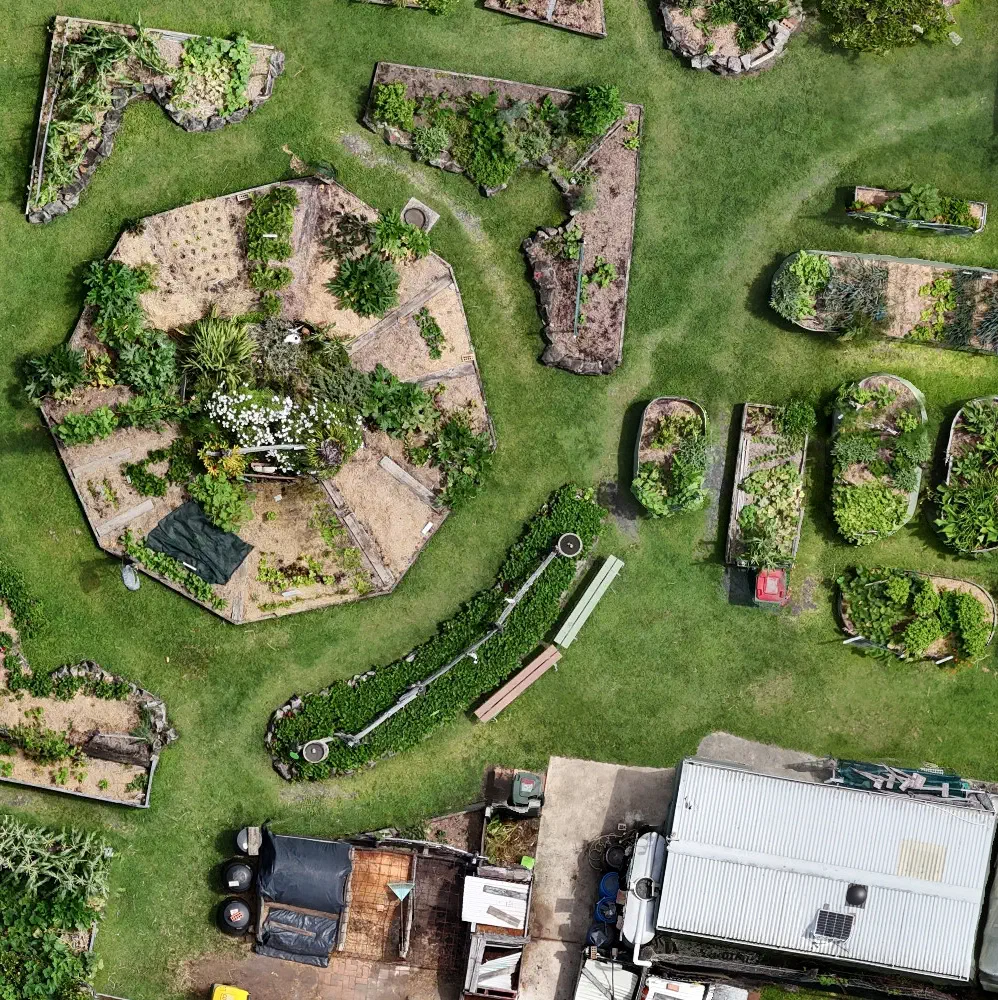
Above: Drone imagery of a community garden project.
Benefits of Drone Mapping
Whether you’re envisioning a thriving permaculture system for your own land or crafting a sustainable design for a client, the journey begins with a solid base map.
While freely available satellite and aerial imagery can be a starting point, it can be outdated and the image quality may be limited. Drone imagery provides a solution with excellent detail and up-to-date information, simplifying mapping and leading to more professional designs.
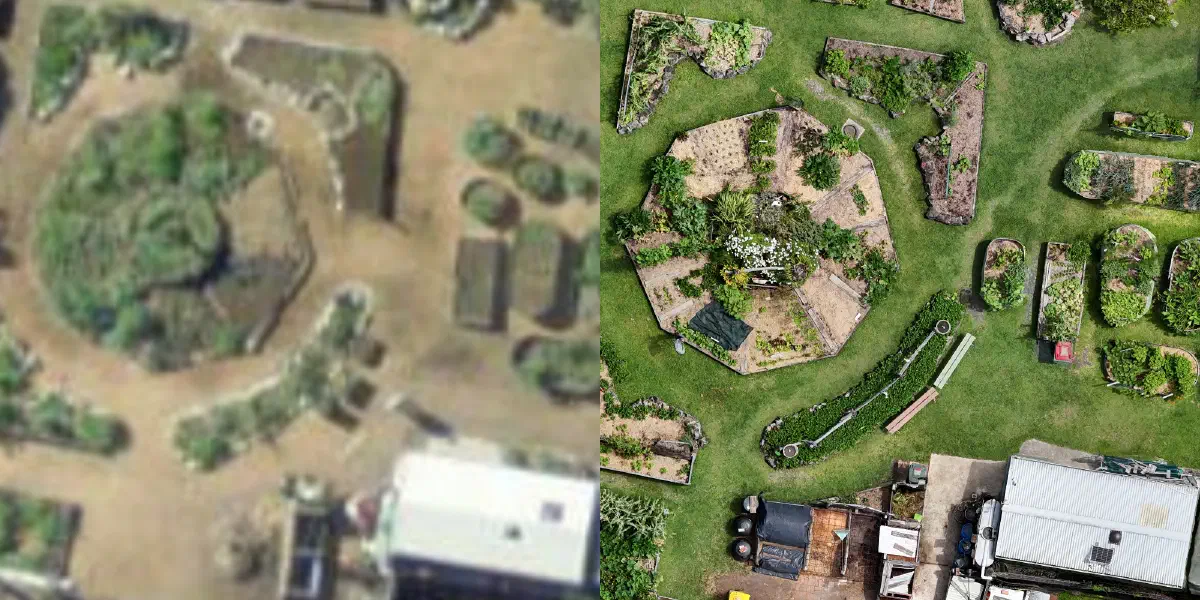
Illustration 1: Publicly available aerial imagery (left) vs drone orthophoto (right). In this particular case, the aerial image is reasonably recent, however, lacks the level of detail. Contains data from © State of NSW (Spatial Services).
Utilising drone imagery offers several compelling benefits:
- Up-to-date imagery, and you have control over when that imagery is captured. This ensures that your base map reflects the current state of your land, unlike potentially outdated publicly available sources.
- High resolution, allowing for a greater level of detail in identifying features and understanding site nuances.
- Saves time. When compared to manual surveying, drone mapping can be significantly faster, especially for larger properties.
- Captures changes over time. The ability to fly at regular intervals opens up possibilities for observing changes over time, whether it’s tracking seasonal variations or monitoring the progress of your implementation over years.
- Additionally, drones can capture additional angles and perspectives, which can be invaluable not only for detailed mapping but also for creating promotional materials to showcase your property or design work.
- Finally, as drones are getting more affordable, this powerful mapping technology is accessible to a wider range of individuals and small businesses.
Step-by-Step: Planning Drone Imagery Capture
Prerequisites: A drone with a camera and GPS (e.g., DJI Mini 4 Pro)
We like to begin by planning the drone flight.
- Is flying a drone over the property permitted? Check local laws.
- What is the size of the property? We recommend starting with 1 acre or less before undertaking larger jobs.
- Choose a suitable time for the flight. We prefer flying when the sun is high in the sky, usually around midday when shadows are shortest, and in weather conditions ranging from sunny to overcast. Avoid rain or heavy wind, as strong gusts not only present a safety hazard but also move tree canopies around, which can cause significant errors and inaccuracies when the photogrammetry software tries to stitch the photos together.
How We Do Drone Mapping
Important Notice & Disclaimer
- Not Survey-Grade Accuracy: The workflows, tools, and processing methods described in this guide are intended solely for hobbyist use and basic ecological landscape design planning. They do not produce survey-grade or centimetre-accurate data. Do not rely on these maps for property boundary determinations, legal disputes, construction planning, or any scenario requiring certified spatial accuracy. Intended for Hobbyist Drones: This guide is tailored for standard hobbyist and consumer drones. Users must ensure compliance with all local aviation laws, privacy regulations, and airspace restrictions, for example CASA regulations in Australia or FAA rules globally, before planning or executing any flight.
- Software & Processing: The processing steps rely on third-party software, such as WebODM Lightning and Litchi. Permiehub is not responsible for the performance, costs, data privacy policies, or outcomes of these external platforms.
- Liability: Flying drones and utilising manual or automated flight plans carries inherent risks of property damage or equipment loss. You assume full responsibility for the safe operation of your aircraft and the application of any maps generated from this workflow.
To capture accurate drone imagery for a property, our approach involves taking a series of drone images. Unlike taking a single photograph, which would inevitably be skewed due to perspective and might not even capture the entire property, we capture an array of photos in a grid pattern.
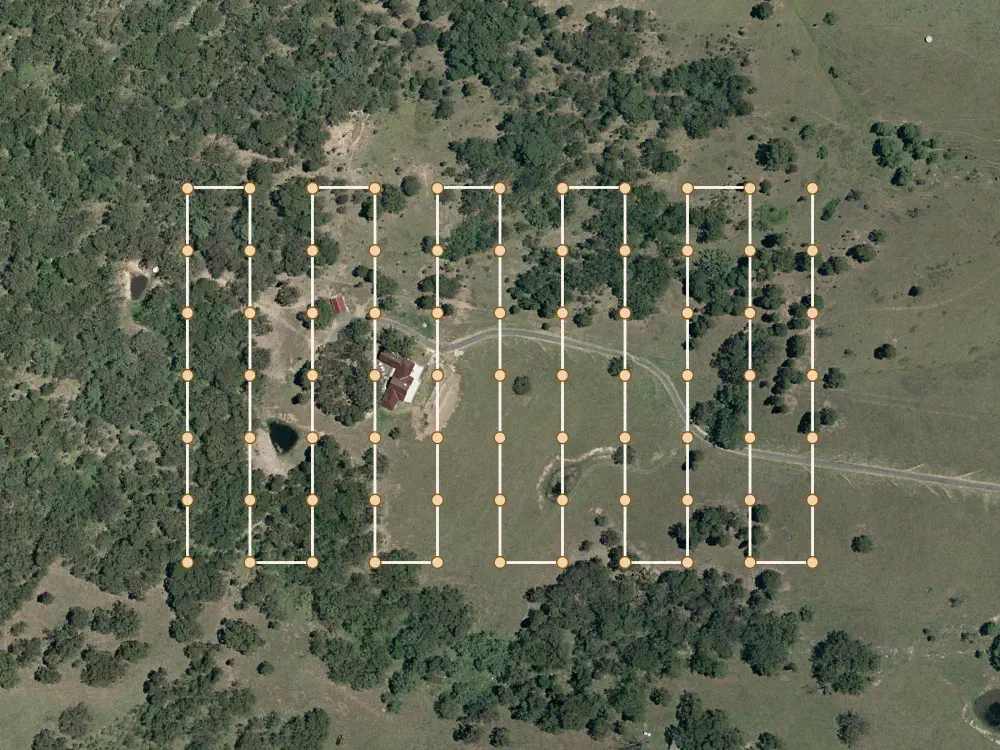
Illustration 2: Example of a drone flight plan for orthophoto mapping. Contains data from © State of NSW (Spatial Services).
For smaller properties, this can often be achieved by flying the drone manually; however, for larger properties, we would typically create a predefined flight plan to ensure comprehensive coverage. These multiple overlapping images are then processed using specialised software to generate an orthophoto.
Step-by-Step: Manual Mapping Flight
This section will show how we capture drone imagery suitable for mapping.
- Choose a takeoff spot. We recommend a hard surface such as concrete. You can also bring your own drone landing pad.
- Perform your regular pre-flight checks, such as verifying if takeoff is permitted under the current conditions and checking for obstacles like trees and power lines.
- Take off.
- Ascend to a suitable altitude above the ground. For small projects (1/4 - 1 acre), an altitude between 30m (100ft) and 60m (200ft) is a good starting point. Always pay attention to your surroundings and adjust accordingly.
- Orient your drone’s camera. For our purposes, 90 degrees downwards works well.
- Fly in a grid-like pattern to capture footage covering the entire property. Importantly, a high overlap between photos is necessary for photogrammetry algorithms to work reliably. As a rule of thumb, aim for 80% frontal overlap (along the flight line) and 60% side overlap (between parallel flight lines); lower overlaps increase the risk of the algorithm producing various glitches.
- Safely land back at your starting location.
Flight Planning for a Large Property
Manual imagery capture can quickly become difficult as property size increases. Our favourite tool to automate flights is Litchi Hub. You can simply mark out an area to map, it generates a flight plan, and you can upload it into your DJI controller, such as the DJI RC-2, or your phone if you are using a DJI RC-N3 controller or similar. The workflow is completely free for certain drones when using the DJI Fly app, for example, we have successfully used it with the popular DJI Mini 4 Pro paired with DJI RC-2 and DJI RC-N3 controllers. For some other drones, you may need to install Litchi’s paid app, Litchi Pilot, instead of the DJI Fly app.
Flight Planning using Litchi Hub
Step-by-Step: Create project & define mapped area
- Go to Litchi Hub
- Create Flight. In the bottom left corner, tap the Folder icon and click “Plan New Flight”.
- Select Area Mapping, select your drone, and choose the “DJI Fly” app if available for your drone to keep the workflow free.
- Tap on the map to mark out your approximate takeoff location.
- Subsequent taps on the map will create an outline of the mapped area. Tip: If possible, map a slightly larger area than the block you are designing, as features just outside the boundary can still affect your landscape design.
- Adjust Altitude. Make sure you select an altitude that avoids crashing into any obstacles such as trees, power lines, hills, and structures. Note that the lower you fly, the more photos the drone will need to take and the image resolution will be higher*.
- Adjust Speed. Litchi Hub will warn you if the camera cannot keep up with the drone’s speed. If this occurs, simply lower the speed. Unless you are mapping a very large area, the flight will still be remarkably quick. For example, mapping a 2.4ha area at an altitude of 55m and a speed of 4m/s will only take 5.5 minutes to execute. See the summary in the top-left corner.
- In Advanced settings, you can optionally adjust the orientation of the grid pattern and the overlap percentage of individual photos.
* It is best if you are already familiar with the property or can fly the drone before flight planning to verify a safe altitude. If unsure, opt to fly higher and check if the image quality is sufficient for your purpose - most likely, it will be. You can also update the altitude later using your controller; however, this will alter the image overlap and resolution, so it is best to avoid making large adjustments on the fly.
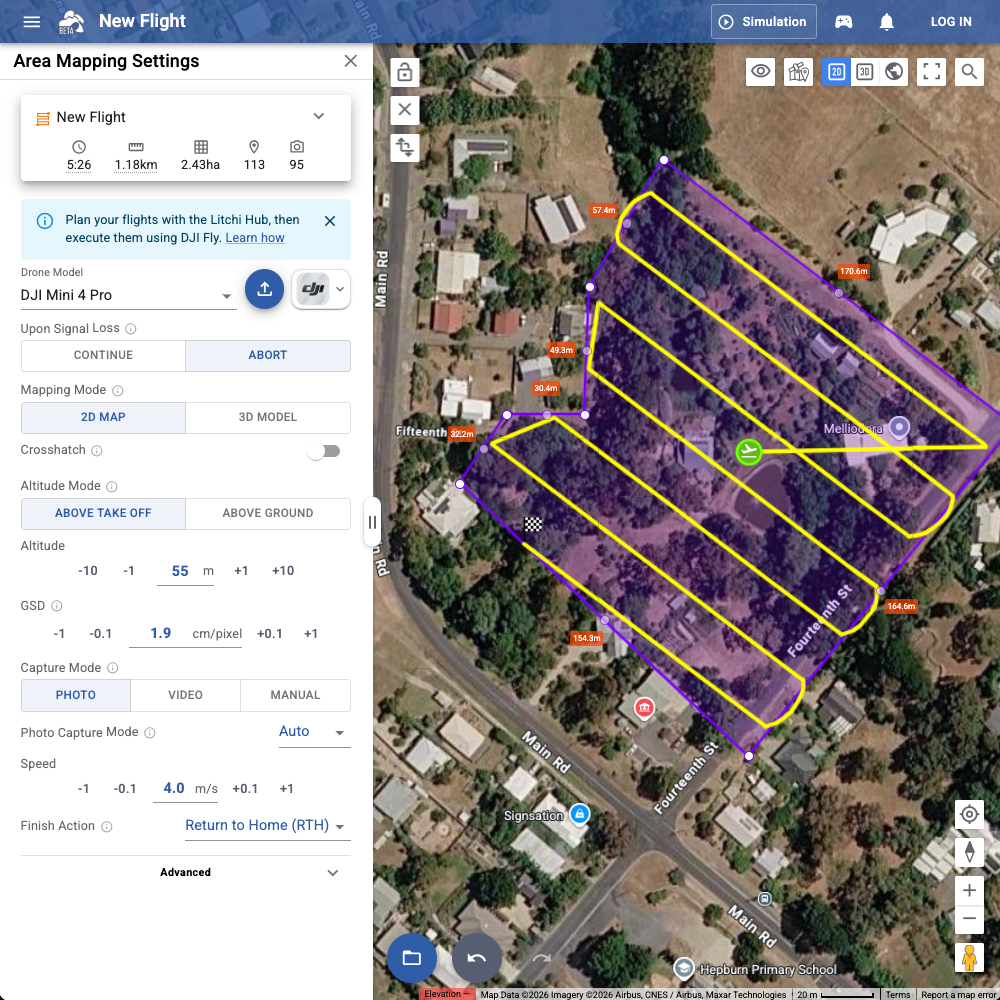
Litchi Hub - Example of a selected area for mapping
Step-by-Step: Upload the Flight Plan
Prerequisite: You must have previously created a temporary flight plan via the DJI Fly app. This plan will be replaced by your new one, as Litchi Hub can only overwrite existing flight plans — it cannot generate brand-new files directly on the device.
- Open Export Window. Click the “Upload” button in the left sidebar.
- Install Litchi Hub Bridge. Download, install, and launch the Litchi Hub Bridge application. Currently, Windows and macOS version 14 or later are supported*.
- Connect your controller. Connect your DJI RC-2, or the phone you use with your DJI RC-N3 or similar controller. You may need to change your phone’s USB preferences to “File Transfer” mode.
- Upload the flight. Select one of the existing flight plans from the list and click “Overwrite”.
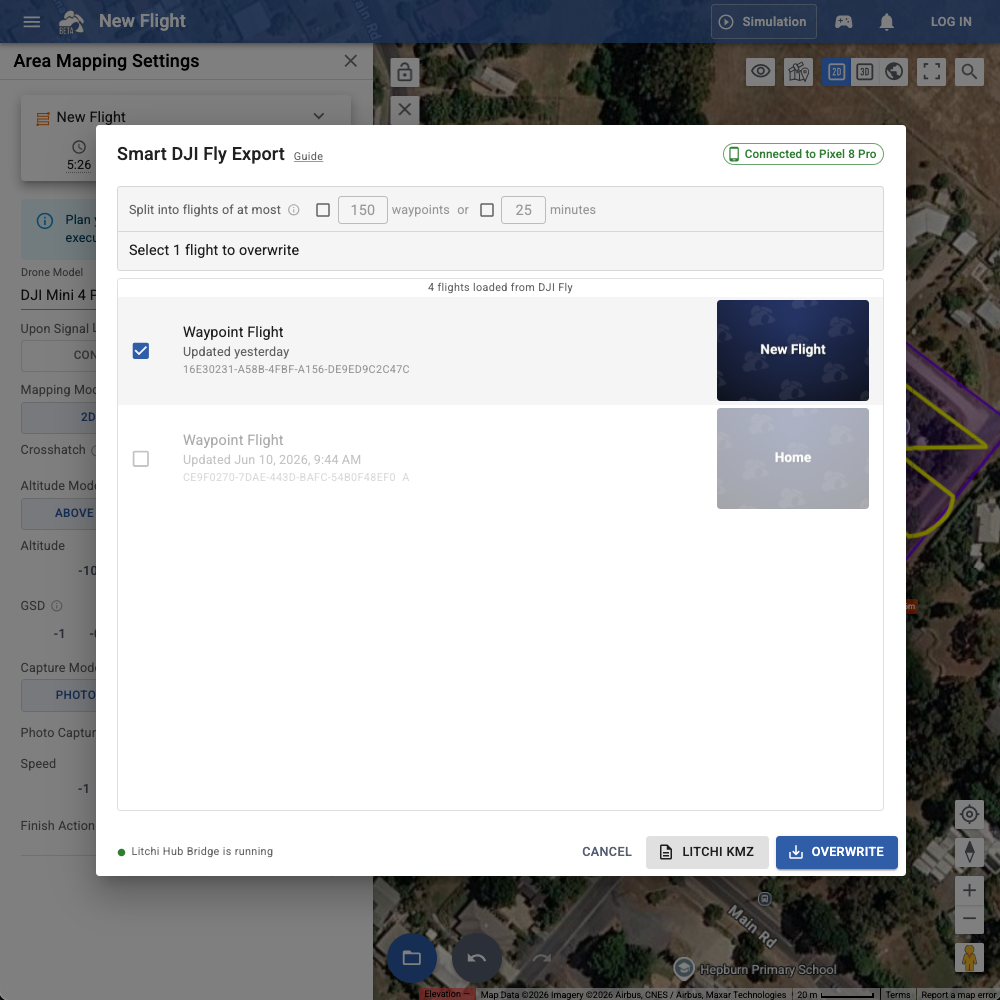
Litchi Hub - Uploading the flight to a phone or controller
Step-by-Step: Execute the Flight Plan
- Choose a takeoff spot. We recommend a hard surface such as concrete. Alternatively, you can bring a dedicated drone landing pad. Ideally, position yourself where you can maintain continuous visual line of sight with the drone across the entire site.
- Perform your regular pre-flight checks. Verify that takeoff is permitted under local regulations and check the flight path for immediate obstacles like trees and power lines.
- Load the Flight Plan. Locate and load the flight plan on your controller.
- Start the Flight Plan. Double-check that a suitable altitude is set and the speed is manageable. A good starting point is 4 to 5 m/s. Tap Go.
- Monitor the Drone. The drone will automatically take off, capture all required imagery, and return to land at the origin. Maintain continuous observation of your aircraft to ensure a safe flight.
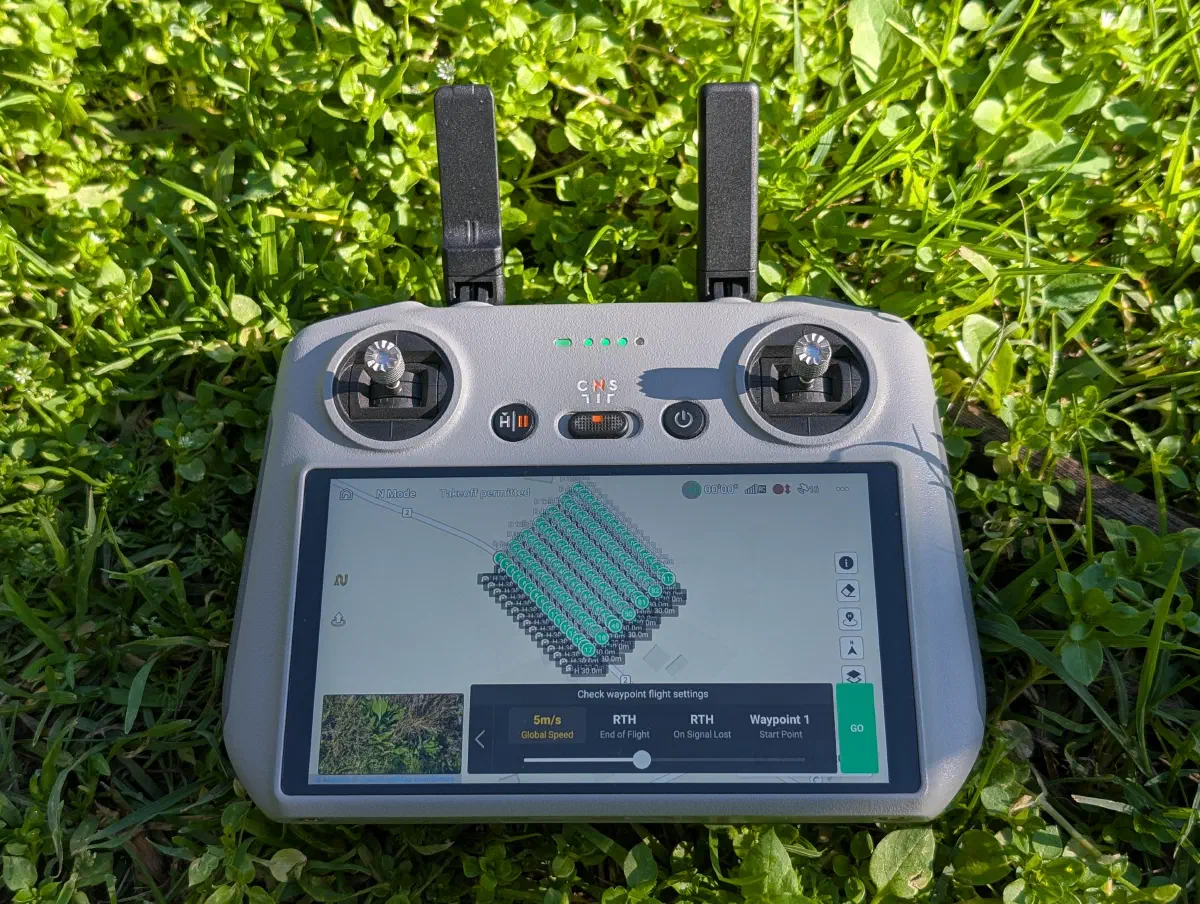
DJI RC-2 Controller - flight plan loaded and ready to start.
What Is Orthophoto?
An orthophoto is a geometrically corrected aerial image where the perspective distortion has been removed using photogrammetry algorithms, resulting in a uniformly scaled image, much like a traditional map.
Photogrammetry vs LiDAR
In this article, we talk about mapping using a drone equipped with a camera and processing captured images using photogrammetry methods, which can create orthophotos or 3D models from overlapping 2D images. This approach is excellent for orthophotos and even small drones are suitable for this job.
Larger drones can additionally carry LiDAR, an active sensor that emits laser pulses and measures their return time to directly calculate 3D points. Its ability to penetrate foliage allows some laser pulses to reach the ground, enabling the mapping of terrain beneath vegetation - a key advantage over photogrammetry in densely vegetated areas. This is a more advanced and expensive setup, out of scope of this article.
How Do We Create Orthophoto?
Numerous software solutions exist for generating orthophotos from aerial imagery. While many options are commercially licensed, free alternatives are also available. Our favourite is WebODM, a powerful open-source software. It offers the flexibility of being self-hosted and run on a personal computer. However, its setup process is generally geared towards more advanced users.
For those seeking a simpler entry point, WebODM Lightning offers a user-friendly interface. This makes it an excellent choice for beginners to start creating orthophotos without the complexities of a full WebODM installation.
Step-by-Step: Processing Imagery
How do we combine all the captured imagery into a single orthophoto? It’s simple, read on!
- Copy the images from your drone to your computer.
- Register at WebODM Lightning and sign in.
- Upload all relevant images using Direct Node Upload > Add Files…. Avoid uploading irrelevant images, especially those pointing upwards, such as images with a visible horizon or sky.
- Click Start Task. You can close the browser window; you will be notified when the job is done.
- Download the zip file. Extract it to view the generated orthophoto (located in the
odm_orthophotodirectory).
What Do We Do With Orthophoto?
We upload the processed image to Permiehub and use it as a reference image for our mapping. Structures, trees, and other features can be traced and recorded in the digital map, and will inform the next steps of the design.
Step-by-Step: Using Orthophoto in Permiehub
Now, let’s put the orthophoto to good use by importing it into Permiehub and starting to map, measure, and finally design!
- Sign in to Permiehub.
- Click Create new project.
- Go to References overlay.
- Click Select Image to Upload and choose the orthophoto. When using WebODM, it’s called
odm_orthophoto.tifand is located in theodm_orthophotodirectory. - Permiehub automatically scales your photo using information extracted from the GeoTIFF format; we do not store the actual coordinates.
- The image is oriented north. If you have an existing drawing, align it with the image by moving it to the correct position. For easier alignment, you can make the image semi-transparent by clicking the square icon in the Objects List panel.
- Use the image as your reference for your Base Map and other overlays.
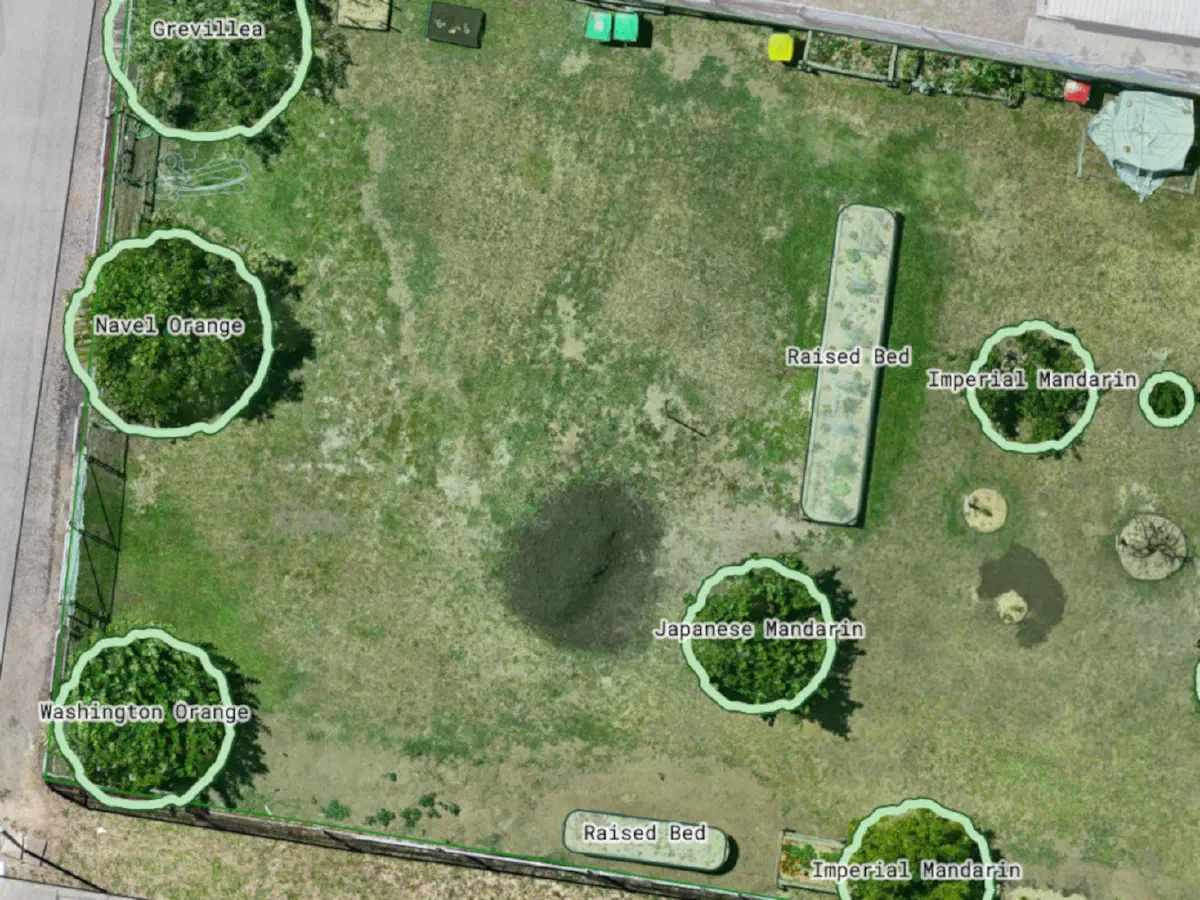
Illustration 3: Example of trees and raised garden beds mapped using drone imagery and Permiehub.
Don’t Have a Drone?
We recognise that owning and operating a drone, and the subsequent image processing, isn’t always feasible. If that’s the case, perhaps someone in your network has a drone and could assist you, or you could hire a local drone pilot to capture the necessary imagery.
Whichever route you choose, leveraging up-to-date and high-resolution drone imagery is a great first step to bringing your or your client’s vision to life.
Thank You for Reading
We hope you’ll find this guide useful! Got feedback? Let us know at [email protected].